Well done!
You have completed How to Build a Google Chrome Extension: Strong Password Generator!
- 2x 2x
- 1.75x 1.75x
- 1.5x 1.5x
- 1.25x 1.25x
- 1.1x 1.1x
- 1x 1x
- 0.75x 0.75x
- 0.5x 0.5x
Ever wanted to make your own Google Chrome Extension? Follow along as Dustin builds a strong password generator and then converts it to a Google Chrome Extension! This project is built with HTML, SASS, and vanilla JavaScript so a good understanding of those concepts will help you understand this project. If you need a refresher, take a look at some of the courses in the Teacher's Notes that cover the basics.
Sections
- 1:28 HTML
- 9:07 SCSS
- 19:29 JavaScript
- 32:45 Convert to a Chrome Extension
Related Content
JavaScript snippet for returning the full alphabet in lowercase
const lettersLowerCase = [...Array(26)].map((_, i) => String.fromCharCode(i + 97));
SCSS variables used
$primary: #7785fe;
$white: #fff;
$text-dark: #616b74;
$text-darker: #465059;
$text-light: #8E9BA7;
$light-gray: #CCCFD3;
$lighter-gray: #F5F5F5;
$logo-size: 50px;
Resources
Remember, it’s recommended to use software specifically designed to store and manage passwords. 1Password is a popular resource for safely working with passwords.
TeamPassword is another affordable option built from the ground up with teams and businesses in mind.
Figma is a powerful, free, and easy-to-use tool for creating wireframes, mockups, and icons.
Related Discussions
Have questions about this video? Start a discussion with the community and Treehouse staff.
Sign upRelated Discussions
Have questions about this video? Start a discussion with the community and Treehouse staff.
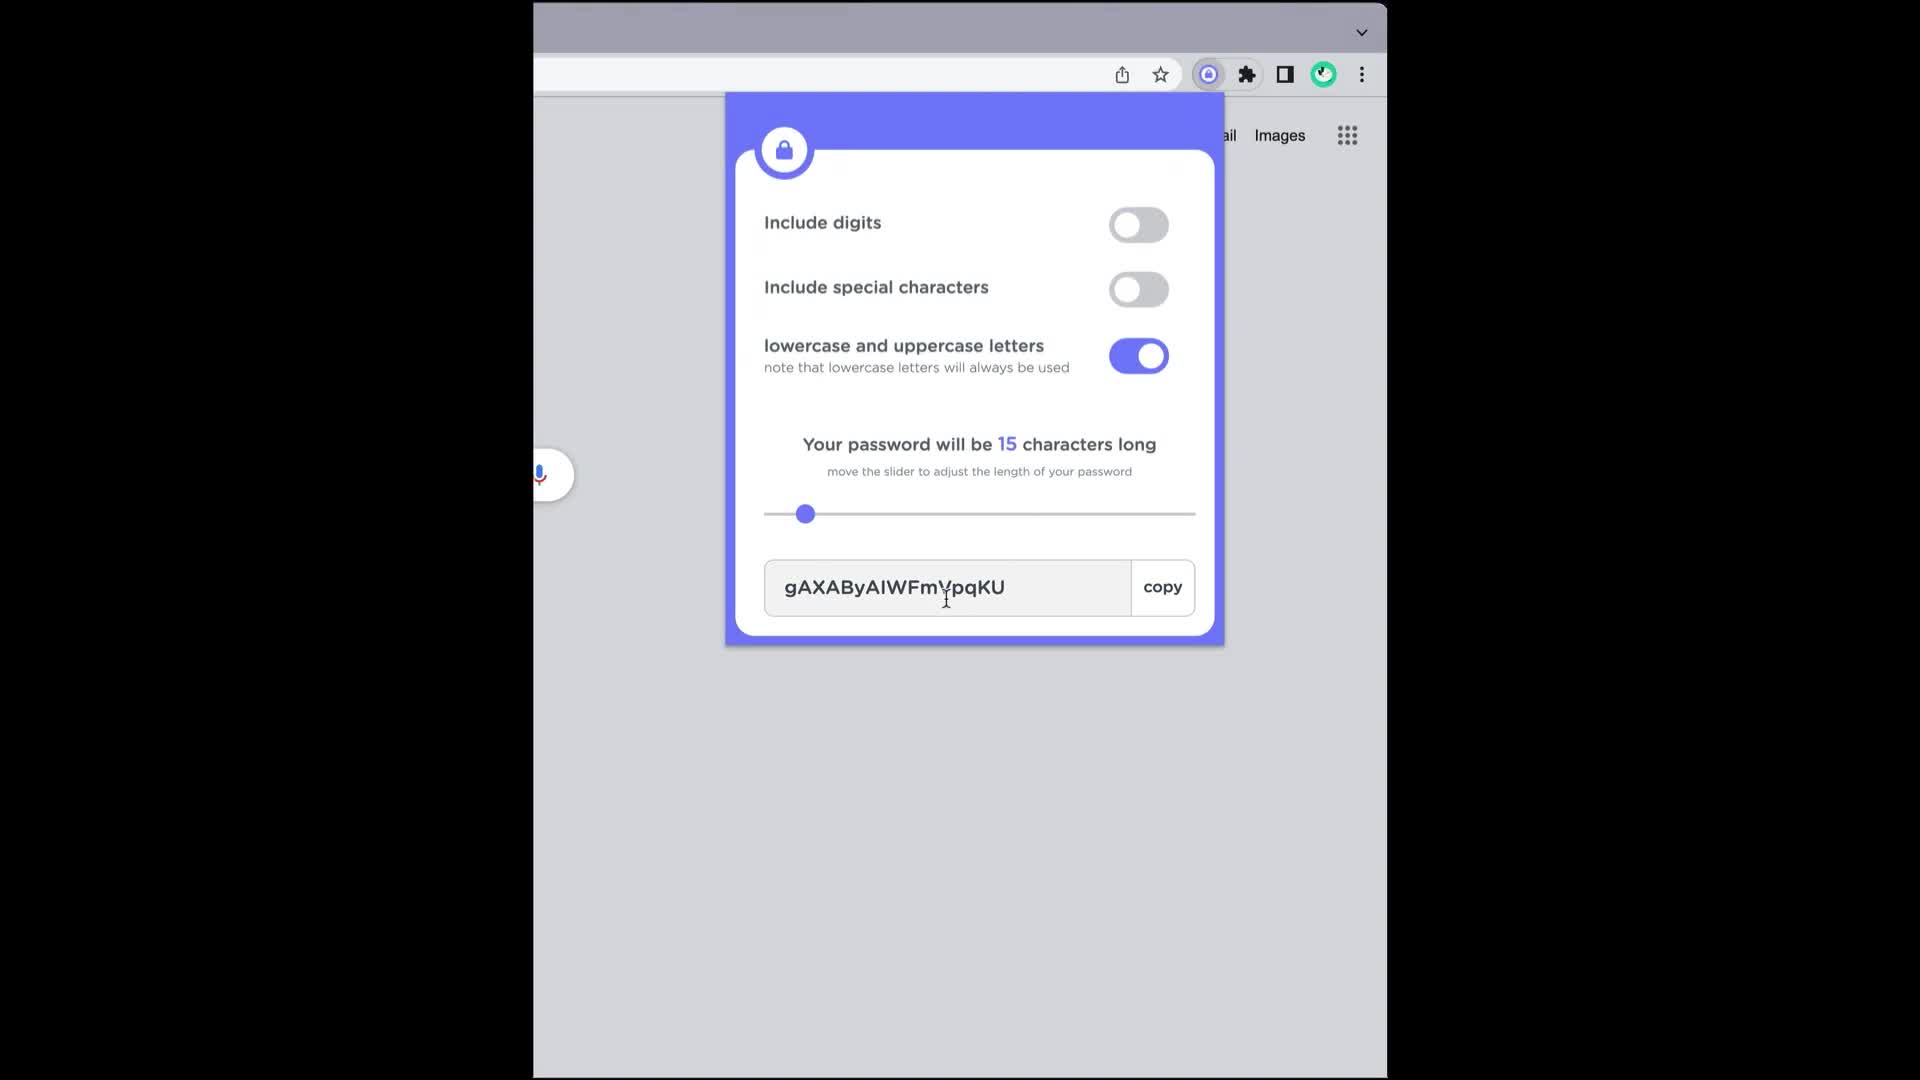
Sign up[MUSIC] 0:00 Hey, what's up. 0:09 My name is Dustin and I'm a developer here at Treehouse. 0:10 Today I wanna take you through setting up a Google Chrome extension. 0:12 It's actually a lot simpler than it seems. 0:15 We'll be creating a strong password generator. 0:18 This extension will allow us to generate a random strong password customized to 0:21 our liking. 0:25 We'll be able to choose if we want numbers, special characters, or 0:26 a mix of uppercase and lowercase letters. 0:29 We'll even be able to choose how long we want the password to be, and 0:32 then we can copy our password to our clipboard when we're done. 0:35 Before we get started, I do wanna mention that this project is for 0:39 learning purposes only. 0:42 Yes, we'll be using HTML, CSS, and JavaScript to build out our Google Chrome 0:44 extension, and this is a great project to practice those skills. 0:48 But it is absolutely not recommended for 0:52 you to use something like this to work with your passwords. 0:54 Instead, you should use software that's specifically designed to securely manage 0:57 and store your passwords. 1:01 I'll link below some helpful resources to some good password managers and 1:02 articles on why you should use them. 1:05 But if you're familiar with the topics that I've discussed and 1:08 you wanna get started, we'll be building this project from scratch. 1:10 So open up your favorite text editor and let's get started. 1:13 This is a longer video, so if you'd like to skip to a specific part, 1:17 check out the description or teacher's notes down below. 1:20 So let's get started building out our Google Chrome extension. 1:24 There is no GitHub repo associated with this project. 1:28 So all you need to get started is to either create a new repo for 1:31 your project or just create a project folder on your machine, and 1:34 open it up in your favorite text editor. 1:37 I'm gonna use VS Code but feel free to use whichever you prefer. 1:41 The only things my project folder has are some icons and an assets folder, 1:44 as well as the mockup of project that we'll be building. 1:48 I have named the icons icon16, icon48, and icon128 respectively. 1:52 And their name corresponds to their dimensions. 1:57 And these icons are what are used in Chrome to show your extension. 1:59 I won't go into how I made these, 2:03 but you can download some icons from the Internet or just create your own. 2:04 I like to use a free application called Figma to create fun little icons 2:09 like these. 2:13 I'll leave a link down below in the description or teacher's notes for 2:14 more information about Figma. 2:17 But you don't need any icons to get your extension to work, 2:19 so you can still follow along if you don't have them ready yet. 2:21 Let's get started setting up some files that we'll need. 2:25 I'll first create a popup.html file. 2:28 And this may seem super weird that we're naming it popup.html, but 2:31 it'll make sense when we start converting this to a Chrome extension later on. 2:34 In my popup.html file, 2:39 I'll create some boilerplate by writing an exclamation mark and tab. 2:40 And this is an image shortcut. 2:45 I'll link more info on that down below. 2:46 Let's give our project a name. 2:49 I'll update the title to say Strong Password. 2:51 Next we can link up our style sheet. 2:54 This doesn't exist yet, but we'll create that up in a bit. 2:56 I'll write the path for an app.css stylesheet inside of our styles folder. 2:59 Next, I'll link up our scripts file, which also doesn't exist yet, but 3:05 we'll create that soon. 3:08 I'll write the path for an app.js file inside of a scripts folder. 3:10 Now that all those files are linked up, let's actually create them. 3:15 I'll create a folder for our styles and I'll name it styles. 3:19 And I'll set up a folder for our scripts named scripts. 3:22 Next, I'll just create an app.js file inside of the scripts folder, and 3:25 then I'll create an app.scss file inside of our styles folder. 3:30 Since we'll be writing a lot of CSS, I'm choosing to write this with SCSS. 3:35 I won't be doing anything super complex with it, but I'll just be using it for 3:39 nesting some CSS rules. 3:44 If you wanna follow along with me, there's really no learning curve to how I'll 3:45 be using it if you've never used it before. 3:49 To get started using SCSS though, you'll just need to install one extension. 3:51 Head on over to your text editor's extensions menu and just type in sass. 3:56 In VS Code, you'll see this Live Sass Compiler extension by Glenn Marks. 4:00 You'll wanna install that. 4:05 And once it's installed, 4:07 you should notice this Watch Sass button at the bottom of the text editor. 4:08 Whenever you're ready to start styling our project, 4:12 you'll just wanna click on the Watch Sass button, and 4:15 it'll automatically create a CSS file with all of our compiled SCSS inside. 4:18 And this is the file that our HTML file is linked with. 4:23 With that all out of the way, let's start writing some code. 4:29 I'll close out all the files except for our popup.html file, 4:32 and I'll also open up our mockup. 4:35 I'll push the mockup to the right of the text editor so 4:38 that I can see it side by side with our HTML file. 4:41 The first thing that we can do is set up a container for our UI. 4:45 I'll create a div with the class of container. 4:49 And taking a look at our mockup, the first thing that we can put into this container 4:52 div, is a container for our lock logo in the upper left corner. 4:55 I'll create a div with the class of lock-logo-div. 4:59 And inside of that, I'll just throw in our image of our icon. 5:02 This lock icon will be positioned absolutely later in the CSS. 5:05 The next thing that we can tackle is creating sections for 5:10 each of our main blocks of the UI. 5:13 I'll first create a section for our settings. 5:15 I'll create a section element with the class of settings-container. 5:18 And in this section we'll house all of those toggle switches. 5:21 For each setting, let's create a div with the class of setting, and 5:25 each one of these settings will have a label and a checkbox input. 5:28 Will style these checkbox inputs to look like toggle switches later in the CSS. 5:32 Let's create a label and we'll leave the for attribute empty for now. 5:37 And inside of this label, I'll create two spans, one for the settings title and 5:41 one for the optional settings description. 5:45 Now we can hop outside of our label element, and 5:49 I'll create our input with the type of checkbox. 5:52 I'll give it the checked attribute since in the mockup it looks like 5:55 the first checkbox is initially checked. 5:58 Then I'll give this one an id of includeDigits. 6:01 I'll copy over this id and paste it into our label' s for attribute. 6:04 This is so that we can map the label with the correct input. 6:08 And clicking the label will also toggle the checkbox, which is great UX. 6:11 Next, we'll just repeat this process of creating an individual setting for 6:16 each of the settings in our mockup. 6:19 And I'll make sure that each input has the same id as its label's for attribute and 6:21 I'll update the title and descriptions. 6:25 Also make sure to add a check state for 6:27 each of the settings that need to be checked by default. 6:29 Once that's done, I'll close each setting block in my HTML as well as the section 6:37 block for our settings container. 6:41 Next, let's set up a new section. 6:49 I'll create a section element with the class of character-length. 6:51 In here, we can just put a paragraph tag with the text, your password will be, and 6:56 then we can put in a span element with the ID of charLengthSpan. 7:00 And we'll just write 15 as the span's text, and 7:05 we'll finish the paragraph tag with characters long. 7:08 Next we'll add another paragraph tag with the text move the slider to adjust 7:13 the length of your password. 7:18 Now we'll create that slider. 7:20 It's actually pretty simple, it's only an input with a type of range. 7:22 And we'll give it a few attributes. 7:26 For the id, I'll write characterLengthSlider. 7:28 And I'll set its min to 10, its max to 75, and its value to 15. 7:32 And that will be it for our character length section. 7:38 So let's close down that code block, and now we can create our last section, 7:42 which is going to be for the randomly generated password. 7:46 We can start that off by creating another section element, and 7:50 we'll give it the class of generated-password. 7:53 Taking a look at the mockup, it looks like we'll need an input and a button. 7:57 So I'll start by creating an input with the type of text, and 8:01 I'll give it an id of generatedPassword. 8:04 I'll also add spellcheck=false. 8:09 And this is just so that we don't have a red line under our generated password. 8:11 And finally, we'll create a button element with the class of copy-password as well as 8:16 an id of copyPassword. 8:21 For the button's text, we'll just write copy. 8:24 I want to show the user that their password has been copied to their 8:27 clipboard, so I'll create a div element that will position absolutely inside of 8:31 this section element. 8:35 That will be the full height and width of this generated-password section. 8:36 And in the center of this div, 8:40 it'll display copy once the button's been clicked. 8:42 So let's go ahead and add that now. 8:45 I'll just create a div with the class of confirmation as well as an id 8:47 of confirmation. 8:51 And inside I'll just create a paragraph tag with the text password copied. 8:53 Sweet, that's all for our generated password section as well as 8:59 all the markup that we'll need for our Chrome extension. 9:02 So let's start styling this up. 9:05 Let's open our SCSS file and make sure you click the Watch Sass button at the bottom 9:08 of your editor if you're using VS Code. 9:12 It should say Watching. 9:14 I'll first paste in an import for a Google font, and I'm using Gotham Rounded, but 9:16 feel free to use whichever Google font that you'd like. 9:20 I'll also paste in some SCSS variables that I've created beforehand to help us 9:24 style out our UI. 9:28 You can copy these from the description or teacher's notes down below. 9:29 If you're new to SCSS, let me show you how variables work. 9:33 You define them by writing a dollar sign and then the name of the variable. 9:36 And to use them, you just write the same name as a value to a property. 9:40 Let me give you an example. 9:44 On line three, we see an SCSS variable named primary. 9:45 I'll use this as the value for a color property inside of a CSS rule. 9:49 It's pretty straightforward. 9:53 Let's remove this example and start styling our extension. 9:55 Since this guide is mostly focused on the JavaScript, as well as converting this 9:58 into a Chrome extension, I'll speed up the styles portion of this tutorial a bit. 10:02 Feel free to slow me down if you need to. 10:06 We can get started by writing some styles to reset our browser's default styles. 10:09 I'll update the margin and padding to 0 and set the box-sizing to border-box. 10:13 Next, let's set up a body rule and give it some styles. 10:18 I'll update the font-family to Gotham Rounded with a sans-serif fallback. 10:21 We'll update the font-size and font-weight. 10:26 And we'll use our primary variable to set our background-color. 10:28 We'll also update the text color with a variable and then we'll add some padding. 10:32 Now that we have a few initial styles, 10:39 let's open up popup.html in the browser and check it out. 10:42 Don't worry, this won't always live in the browser, 10:45 we'll transform this into a Chrome extension when we're done. 10:48 Great, looks like our styles are applying, so 10:51 let's hop back into the SCSS and set up a rule for our container class. 10:54 We'll just add a width of 400 px, a white background-color, 10:58 1rem of border-radius, and I'll also add some padding. 11:02 Next, we'll add a position of relative so that we can absolutely position our logo. 11:06 Now, let's target that logo container by writing a rule for 11:11 our lock-logo-div class. 11:14 To style out the logo, just write we'll position it absolute and 11:16 then set the top property equal to our logo-size variable divided by -2. 11:20 Then we'll set the left to 1rem, and we'll use our logo-size variable for the height, 11:25 and width, and set the background-color to white. 11:30 We can give a border of 6px solid with our primary variable for the color. 11:33 And then we'll center the logo inside of the div by writing a display of flex. 11:37 And we'll justify the content center and align the item center. 11:42 And then last, 11:46 we can give our border-radius of 50% to make it a perfect circle. 11:47 We'll then nest the logo image and give it a width of .9rem. 11:51 Now, we're going to style our first section. 11:56 I'll write a new rule for section with the class of settings-container. 11:58 Inside this rule on nest our setting class and start by giving it a display of flex, 12:03 we'll align the item center, and then we'll add some margin. 12:08 Then we'll nest the label for this setting class and give it a width of 80%, 12:11 and some right padding. 12:16 We'll then nest the span inside of the label and give it a display of block. 12:17 Now, I wanna target the first span and give it a font-weight of 500 and 12:22 a font-size of .9rem. 12:27 And for the last span element, which is our optional setting description, 12:29 we'll lower the font weight to 300. 12:33 We'll add a darker text-color and update the font-size to .7rem. 12:35 And then we'll just adjust the top margin to .15rem. 12:40 I'll now close down our label rule code block, and 12:44 all now nest an input with the type of checkbox inside our setting rule. 12:47 To get these checkboxes to look like toggle switches, 12:52 I'll set the appearance to none and position them relative. 12:55 I'll set the width to 50px and 12:58 then we'll just add a light gray background-color variable. 13:00 I'll adjust the height to 30px and set a border-radius to 25px. 13:04 And then we'll just give them a cursor of pointer. 13:09 So that these switches can have a nice animation, 13:12 we'll also add a transition property of background-color .3s ease. 13:15 Now, we'll add an after pseudo element to the checkbox, and 13:20 give it an empty string for content. 13:23 And then I'll position at absolute. 13:25 To center the switch inside of the checkbox, I'll write transform, 13:27 translate, and we'll translate -50% on the x and y axis. 13:31 And we'll give them 21px in height and width. 13:35 I'll write a white background-color with 50% border-radius, and 13:39 we'll position the top 50% and the left 30%. 13:43 We'll also give some transition values. 13:46 We'll close down the after pseudo-element rule and 13:51 write a checked pseudo-class rule. 13:54 We'll just wanna update the background-color when 13:56 the input is checked. 13:58 And then, we'll nest our after pseudo-element inside this hover rule and 13:59 change the left property to 70%. 14:03 Awesome, now when we click our checkboxes they work like toggle switches. 14:06 Check out the description or teacher's notes down below for 14:10 content specifically covering how to do this in more depth. 14:12 I'll completely close down our first section rule and create a new one for 14:15 our character-length section. 14:19 We can start by adding some margin and aligning the text to the center. 14:21 Now I'm going to target the first paragraph tag and 14:25 up the font-weight to 500 and lower the font-size. 14:29 I'll then nest the span inside of the first paragraph rule, and I'll just give 14:33 it the primary variable for the color, and I'll also up the font size to 1rem. 14:37 Now, outside of the first paragraph rule, I'll target the last paragraph and 14:41 we'll update the margin. 14:46 I'll set the font size to .6rem, and 14:47 we'll adjust the color using the text-light variable. 14:49 All right, now let's style our range input. 14:54 I'll create a rule for an input with the type of range. 14:57 And just like the toggle switches, we'll set the appearance to none. 15:00 I'll add a cursor of pointer and give it a width of 100%. 15:07 I'll remove the outline and give it 2rem of border-radius. 15:11 Now, I'll create a rule for our input targeting the slider's runnable-track, 15:15 and I'll just set the background-color to our light gray variable and 15:20 give it point 15rem in height. 15:24 Then I'll target the input's slider-thumb, and 15:26 this is the draggable part of our range input. 15:29 It'll also get an appearance of none. 15:33 I'll set a -7rem in margin-top, and 15:35 I'll give a background-color using our primary variable. 15:37 The height and width will be set at 1rem and I'll give it 50% border-radius. 15:41 Let's also add some styles for when we focus on the slider-thumb. 15:46 We'll add a thin light grey border, and we'll also add a 3px light grey outline. 15:50 We'll also wanna adjust the outline offset by .125rem. 15:55 And now we see some focus styles when we drag our range input. 16:00 Cool, I think that's it for 16:04 our character-length section, let's start styling the last section of our extension. 16:05 I'll set up a rule for our generated-password section. 16:09 Since we'll want to add a confirmation to the section, I'll 16:13 give it a position of relative, so that we can style the confirmation absolutely. 16:16 I'll also give the section a display of flex and align the items center. 16:21 And now I'll write a rule for both the input and 16:25 the button to give them both the same stylings. 16:27 I'll give them a font-family of Gotham Rounded, a font-weight of 500, and 16:30 then I'll just give it a height of 3rem. 16:34 Now let's target just the input. 16:37 We'll give it a width of 100% and add some border-radius. 16:38 And I'll also add a light gray border. 16:41 We can write border 1px solid and use our light-gray variable for the color. 16:44 Let's also remove the right border. 16:49 Then we'll also wanna use our lighter-gray variable for the background-color, and 16:51 I'll add some padding, and make sure the font size is set to 1rem. 16:56 I'll also give our text-darker variable for the text-color and 17:00 set the outline to none. 17:03 That's it for the input. 17:05 So, now let's target the button. 17:06 We'll set a height of 3rem and a width of 4rem. 17:08 Let's display flex and align the item center, and 17:11 we'll also justify the content center as well. 17:14 We'll set up a light-gray border. 17:17 Then let's add some border-radius. 17:19 And make sure the background-color is transparent. 17:21 We can give it a cursor of pointer and then add our text-darker variable for 17:25 the text-color. 17:29 Lastly, we'll give it a background transition. 17:30 Hitting save, we'll see our input and button looking like the mockup, but 17:33 we should work on the button's hover state as well as the confirmation message. 17:36 What we can do is set up a hover rule for our button, and we'll just wanna update 17:40 the background-color on hover by writing background-color and 17:44 using our lighter-gray variable. 17:47 Now, let's work on the confirmation message. 17:49 Let's set up a rule for our confirmation class and give it a position of absolute. 17:52 We'll set the top and left to 50% and 17:56 we'll translate the x and y axis at -50% as well. 18:00 We'll set the height and width to 100% and give it a white background-color. 18:04 Now let's center the text by writing display flex and 18:09 justifying the content center and aligning the items center as well. 18:12 We'll make the font-weight darker and set the pointer-events to none. 18:16 If you're unfamiliar with pointer-events, setting it to none essentially removes all 18:20 pointer-events such as clicking, hovering, dragging, etc. 18:24 We'll set the opacity to 0 and we'll transition everything .1s ease. 18:27 When we want the confirmation message to show, 18:33 we'll want to reset the pointer-events and opacity. 18:35 So let's write a rule for 18:39 when our confirmation div also has a class of active. 18:40 In this rule, we can set the pointer-events to all and 18:43 bring the opacity back up to 1. 18:46 We can test that this works by opening up the developer console and 18:48 adding the class of active to our confirmation div. 18:51 And now we can see that our confirmation pops in, just how we want it to. 18:54 Let's also animate our paragraph tag that holds the password copy text. 18:59 Above our active class rule, let's target the paragraph tag and give it some styles. 19:03 We can set its initial scale to .2 and give it a transition for 19:08 its transform property. 19:11 Now let's target the paragraph when our confirmation has a class of active. 19:13 All we'll do is just pump the scale up to 1.1. 19:17 And that'll be all the styles that we need. 19:20 Our UI is complete, and it's time to work on the logic for our extension. 19:22 So, let's some JavaScript. 19:26 I wanna store the data that we'll need to generate our 19:28 passwords in individual arrays, so let's set up some variables to hold this data. 19:31 We can set up an array for digits, an array for special characters, and 19:36 we'll also want to set up an array for letters. 19:40 I'll create one array for 19:43 lowercase letters and one array for uppercase letters. 19:45 Now that we've created the arrays, let's populate them. 19:50 In the digits array, I'll just write 0 through 9. 19:53 And in the specials array, I'll throw in a few special characters, 19:57 but feel free to add in as many special characters as you'd like. 20:01 For the array for lowercase letters, you can type out each letter if you want, or 20:05 find an array online that's already written out. 20:09 I went ahead and 20:12 found this bit of JavaScript that returns the full alphabet in lowercase letters. 20:13 I'll just paste this inside the array. 20:17 If you'd like to use this too, I'll paste the snippet in the description or 20:19 teacher's notes down below. 20:23 We can see that this works by logging this variable to the console. 20:24 I'll console.log lettersLowerCase, and 20:28 you see that we are returned with an array with all lowercase letters. 20:30 Because we now have an array with all lowercase letters, what we can 20:34 do is map through that array and run the toUpperCase method on each letter and 20:38 we'll get back an array of uppercase letters. 20:42 So let's do that now inside of the lettersUpperCase array. 20:45 We can start by writing lettersLowerCase.map, and for 20:50 each letter, we want to return the letter.toUpperCase. 20:53 Now let's log lettersUpperCase to the console and see if it worked. 20:57 I'll console.log lettersUpperCase, and 21:02 looks like we get back an array of uppercase letters, perfect. 21:05 Okay, so let's remove the console.log and let's start structuring out our logic. 21:10 Let's set up some variables that we'll need. 21:16 We can first set up a variable called passwordLength and we'll let it equal 21:18 document.querySelector, and we'll target the input with the type of range. 21:23 Now let's set up a variable for all of our check box inputs. 21:28 And we can do this pretty easily by writing const allCheckboxes = 21:32 document.querySelectorAll and targeting the input with the type of checkbox. 21:36 We'll wanna have a main function for generating the password. 21:45 So let's set that up. 21:48 And for now, it'll just log out password generated. 21:49 Now, I wanna make sure that our variables are working by running event listeners. 21:53 So for the range input, we'll write passwordLength.addEventListener. 21:57 And because this is an input, we have access to the change event. 22:01 When we detect a change, let's call our generatePassword function. 22:05 So if we hop into our browser, 22:09 we should see the console update each time we move the slider. 22:11 And perfect, it works. 22:14 Now let's do the same thing for our checkboxes. 22:17 Instead of writing an event listener for each one, 22:19 we can loop over each checkbox and add the event listener. 22:21 So let's do that now by writing our allCheckboxes variable, 22:25 which holds a collection of HTML elements. 22:28 And we'll run the forEach method on it. 22:31 For each checkbox, we'll add an event listener for change. 22:33 Since this is an input, we have access to the change event. 22:36 And when a change is detected, we'll just call our generatePassword function. 22:39 Now, let's test to see if this worked. 22:45 Each checkbox should fire the generatePassword function when its input 22:47 changes its checked state. 22:51 Sweet, it works perfectly. 22:53 Now let's remove our generatePassword function from our passwordLength event 22:56 listener temporarily. 23:01 And we'll wanna give the event listener access to the event. 23:02 This is so 23:05 that we know what the value of the range input is each time the event is triggered. 23:06 Let's set up a variable for the value and have it equal to the event.target.value. 23:11 We can console.log this value in the browser, and 23:17 we'll see the value each time the event is triggered. 23:19 This is perfect because we'll wanna know what the length of our password should be 23:23 based off the range's value. 23:26 Since we now know the value of our range input when it changes, 23:28 we can pass that in as an argument in our generatePassword function. 23:31 We'll just call this argument length. 23:35 And now in our passwordLength event listener, let's call our generatePassword 23:38 function again and give it the value as the parameter. 23:42 We'll wanna know this value even when we aren't changing the length of 23:45 our password. 23:48 For example, if we're clicking one of the toggle switches, 23:49 it'll generate a new password, so we'll still want to know the length. 23:52 So what we can do is in our event listener for our checkboxes, 23:56 we can call the generatePassword function with passwordLength.value as the length 23:59 parameter. 24:03 Now inside of our generatePassword function, 24:05 instead of console logging password generated, let's log the length argument. 24:07 I'll hit Save, and now when we adjust our range input, 24:13 we see its value logged to the console each time. 24:16 And if we check or uncheck a toggle switch, 24:19 the current value of our range input is logged to the console, perfect. 24:21 Now that we know what the password length is, 24:25 we'll also want to initially just call our function when the extension loads. 24:27 So we'll just make a call to generatePassword with 24:32 the passwordLength.value as the parameter. 24:35 Now in our generatePassword function, let's 24:38 start by updating the charLengthSpan in the UI with the length of our range input. 24:41 We can do that by writing document.getElementById('charLengthSpan') 24:47 and setting the textContent to either the length parameter or passwordLength.value. 24:52 Now when we move our slider, 24:57 the UI changes to show the length of our password. 24:59 I'll set up a comment so that we know what this bit of logic is doing. 25:02 And I'll also set up a comment for the next part we'll work on, 25:05 which is working with the checked states of our inputs. 25:09 Let's first set up a variable for each one of our inputs. 25:13 I'll write const includeDigits and 25:16 set that equal to document.getElementById ('includeDigits'). 25:19 Then I'll write const specialChar and 25:24 I'll set that one equal to document.getElementById('specialChar'). 25:27 And lastly, we can set up const letterMix = document.getElementById ('letterMix'). 25:34 You can see that if we console.log each of these variables .checked, 25:42 it returns either true or false based off if the checkbox is checked or not. 25:46 This will come in handy because we'll want to adjust the generated password if 25:51 the setting is turned off or not. 25:54 So what we should do is write .checked on the end of these variables so 25:57 that they hold either a true or false value. 26:00 Now, let's set up an array that can hold all the values that our password could 26:03 possibly contain based off of which settings are toggled on. 26:07 For example, if includeDigits is set to true, 26:10 we'll wanna add our digits array to this array, and so on, and so on. 26:13 I'll set up a variable named possiblePasswordChars and 26:18 set it initially equal to an empty array. 26:21 Now, I'll run a conditional for each of our checkboxes. 26:24 I'll write if includeDigits, which if you remember, returns true or false. 26:28 We'll want to loop over each item in the digits array and 26:33 push it to the possiblePasswordChars array. 26:37 So in the forEach method, we'll just say for each digit, 26:40 possiblePasswordChars.push digit. 26:45 Since includeDigits is currently checked, we should see the value of 26:48 possiblePasswordChars containing our digits. 26:52 I'll console.log possiblePasswordChars and check the console. 26:55 Great, it looks like our array holds the digits. 26:59 So if we turn off the includeDigits toggle, it should be removed from 27:02 the array because when the function is called, we initialize an empty array for 27:06 possiblePasswordChars, and then add the items in as needed. 27:11 So unchecking the checkbox for includeDigits, 27:15 we are now returned with an empty array for possiblePasswordChars. 27:18 Perfect, I'll go ahead and write a comment above the array initialization so 27:22 that we can know that it's reset every time the function is called. 27:27 I'll also go ahead and add some helpful comments to each of the conditionals so 27:30 that we know exactly what's going on and what they're there for. 27:34 So now let's repeat that process for specialChar. 27:37 I'll set up a conditional for our specialChar, and if that input is checked, 27:40 we'll run the forEach method on our specials array and 27:44 push each special character into our possiblePasswordChars array. 27:47 Then I'll do the same for letterMix, but this one will be slightly different since 27:52 we're going to be working with two separate arrays, one for 27:56 uppercase letters and one for lowercase letters. 27:59 We will always have lowercase letters in the generated password, so 28:02 we'll need to write this condition accordingly. 28:06 First, we'll check if letterMix is true, and if it is, 28:10 we'll loop over the lettersLowerCase array and 28:13 push each letter into our possiblePasswordChars array. 28:16 And then we'll do the same for uppercase letters. 28:20 We'll loop over each letter in that array and 28:22 also push it to the possiblePasswordChars array. 28:25 This condition will have an else. 28:29 So if it's not checked, 28:30 we'll still push the lowercase letters into the possiblePasswordChars array. 28:32 And this is so that even if everything is toggled off, 28:38 we can still generate a password with just lowercase letters. 28:41 So we'll basically just rewrite what's on line 30, where we loop over our lowercase 28:45 letters and push each letter into the possiblePasswordChars array. 28:50 Now if we console.log possiblePasswordChars, 28:55 each time we click a toggle switch, 28:57 we should have an array with different possible characters for our password. 28:59 And we see that it's working perfectly. 29:05 So now we have all the possible characters our password can contain based of 29:06 our user's settings. 29:10 This is all the info we need to generate the password, so 29:13 let's set that part up next. 29:16 Since we have access to the length of our password when the function is called, 29:18 thanks to our length argument, let's run a for loop. 29:22 We can write for, and we'll set i to 0. 29:25 And while i is less than or equal to length, we'll want to increment i by one. 29:28 Each time this loop runs, 29:35 we want to insert a character into our generatedPasswordInput field. 29:36 We don't currently have this element set up in a variable, so 29:41 let's set that up real quick. 29:43 At the top of the file, I'll write generatedPasswordInput = 29:46 document.getElementById('generatedPassword'), and 29:50 now we can use this variable in the for loop. 29:54 Back in the for loop, I'll write generatedPasswordInput.value +=. 29:59 And what we'll wanna do is grab a random value from our array of 30:04 possible password characters. 30:08 We can do that by writing our array name and 30:11 using brackets to select a random index. 30:14 To get a random index, we can write Math.floor as a method. 30:16 And inside the floor method, 30:20 we can write Math.random multiplied by the length of our array. 30:23 If we hit Save, you'll already notice a random password generated in the input. 30:27 And this is because we call the function when the extension loads. 30:32 Clicking on a toggle switch should update it as well, but we kind of see a bug. 30:35 We are always adding to the input value, when we need to actually be 30:41 re-rendering the input's value each time we change or update this password. 30:45 And this is an easy fix. 30:50 We need to reset the generated password each time the function is called. 30:52 So all we'll need to do is just write generatedPassword.value = 30:56 an empty string toward the beginning of the function. 31:01 Now, each time we change a setting, the password is re-rendered, 31:05 and we have a perfectly generated password based off how the user wants it. 31:08 Sweet, you'll also notice that we can update the slider to create a different 31:11 length password. 31:16 All that's left to do now is to add some functionality for the user to copy their 31:17 password to the clipboard, and that's actually pretty simple. 31:21 At the bottom of app.js, I'll just set up a variable copyPasswordBtn, 31:24 and it'll equal document.getElementById('copyPassword'). 31:29 And we'll also wanna reference our confirmation container, so 31:34 I'll just write confirmation = document.getElementById('confirmation'). 31:37 Let's set up a click event listener for our button, and 31:42 all we'll need to do is just write copyPasswordBtn.addEventListener. 31:46 And we wanna listen for clicks. 31:50 And inside the callback function, 31:51 all we wanna do is write navigator.clipboard.writeText. 31:54 And writeText is a method that takes in one parameter. 31:58 And that's the text that you wanna copy. 32:01 So let's pass in our generatedPasswordInput.value. 32:03 Now, if we click the Copy button, we can see that we're now able to paste in 32:07 the password because it was copied to our clipboard, pretty neat. 32:11 Now, let's tackle the confirmation. 32:15 We'll just write confirmation.classList.add('active'). 32:18 Now, if we click the Copy button, we get our confirmation popping up. 32:22 But how do we get it to go away? 32:26 Let's set up a setTimeout, and in the callback, 32:28 we'll just remove the active class. 32:31 And we'll set the timeout to 2000 milliseconds or 2 seconds. 32:33 And now, if we click Copy, the message pops up, and 32:38 then it goes away after two seconds. 32:41 Great, okay, so the part that you've all been waiting for, 32:43 how exactly do we turn this into a Google Chrome extension? 32:47 Well, it's extremely simple. 32:51 In the root of your project, just create a manifest.json file. 32:53 In here, you wanna create an object. 32:57 And this isn't just regular JavaScript, so syntax is important. 32:59 Make sure your properties are all surrounded by quotation marks. 33:02 You wanna create a name property, and for the value, 33:07 you can write the name of your extension. 33:10 Since this is the first main version of our extension, set the version to 1.0. 33:12 And you'll also wanna set up a property called manifest_version, 33:18 and set it to number 3. 33:23 Set up a description for your extension, 33:25 I'll just write "A strong password generator". 33:27 And now, we wanna set up a property for our icons, which holds an object. 33:30 In this object, I'll give it a property called 16, and 33:35 the value is a relative path to the 16-pixel icon. 33:39 And then I'll do the same for the 48-pixel icon as well as the 128. 33:42 Then I'll hop out of that icon's object, and then I'll write a property for action. 33:48 This will also be an object, and it will have a property called default_icon. 33:53 And this will have a value that holds the path to my 16-pixel icon. 33:58 Then it'll have another property called default_popup, and 34:04 this holds the relative path for our popup.html file. 34:09 And believe it or not, that's it. 34:12 That's all we need to create this extension. 34:14 Again, you don't need the icons to get this to work, but 34:17 if you have them already, this is how you can use them. 34:20 Next, in Google Chrome, navigate to your Extensions Manager, 34:23 and make sure in the top right you have Developer mode turned on. 34:27 Then you should see an option in the top left called Load unpacked. 34:31 Click this and then select the project folder for your extension and 34:36 click Select. 34:39 And there you go, your extension is now in Google Chrome. 34:40 You can see your unpacked extensions by this red icon in the bottom right 34:44 of your extension. 34:48 If you click on your extensions in the top right of your browser, 34:50 you'll see your extension listed, and you can even pin it. 34:53 And when you click on it, you'll have your fully working extension in 34:57 your Google Chrome browser that you can use anytime you want. 35:00 If you need to make changes to your extension, you can work locally 35:03 in the popup.html file, or you can make changes in the code and 35:07 then press the refresh button in the extensions manager to reload it. 35:11 And you'll see all your changes live. 35:15 All right, we're done, not only did we create a strong password generator, 35:18 but we turned it into a Google Chrome extension. 35:22 And as you saw, 35:25 converting our project into an extension was not very hard to do at all. 35:25 So I hope I start seeing some really awesome extensions in the future. 35:29 Remember, please check out the teacher's notes or description down below for 35:33 articles on secure password managers that you could use instead of this. 35:37 Again, this was just for learning purposes. 35:40 I'll see you all in the next one. 35:43 And until then, have fun and happy coding. 35:44
You need to sign up for Treehouse in order to download course files.
Sign upYou need to sign up for Treehouse in order to set up Workspace
Sign up